| Setting | Default | AWI | OSD | Management Console |
|---|---|---|---|---|
| Enable DHCP | Enabled | |||
| IP Address | -- | |||
| Subnet Mask | -- | |||
| Gateway | -- | |||
| Primary DNS Server | -- | |||
| Secondary DNS Server | -- | |||
| Domain Name | -- | |||
| FQDN | -- | |||
| Ethernet Mode | Auto | |||
| Maximum MTU Size | 1200 bytes | |||
| Enable 802.1X security | -- | |||
| Identity | -- | |||
| Authentication | TLS | |||
| Client Certificate | -- | |||
| Enable 802.1X Support for Legacy Switches | -- |
From the OSD and AWI Network pages, you can manually configure network settings if DHCP is disabled, as well as configure 802.1x security to ensure that only authorized devices access the network.
From the OSD and AWI, you can also configure IPv6 network settings. To configure IPv6 settings, see Configuring IPv6 Settings.
| Info: You can also configure a subset of network settings from the AWI Initial Setup page. | |
|
You can also configure network settings (DHCP, IP address, subnet mask, gateway, and primary and secondary DNS servers) from the AWI Initial Setup page. To configure network settings from this page, see Configuring Initial Setup Parameters. |
| Info: Setting up 802.1x authentication | |
|
For a description of all the components you need to configure 802.1x authentication, as well as the detailed steps you need to follow to configure the authentication, see Configuring 802.1x Network Device Authentication. |
You configure network settings from the OSD and AWI Network pages (shown next).
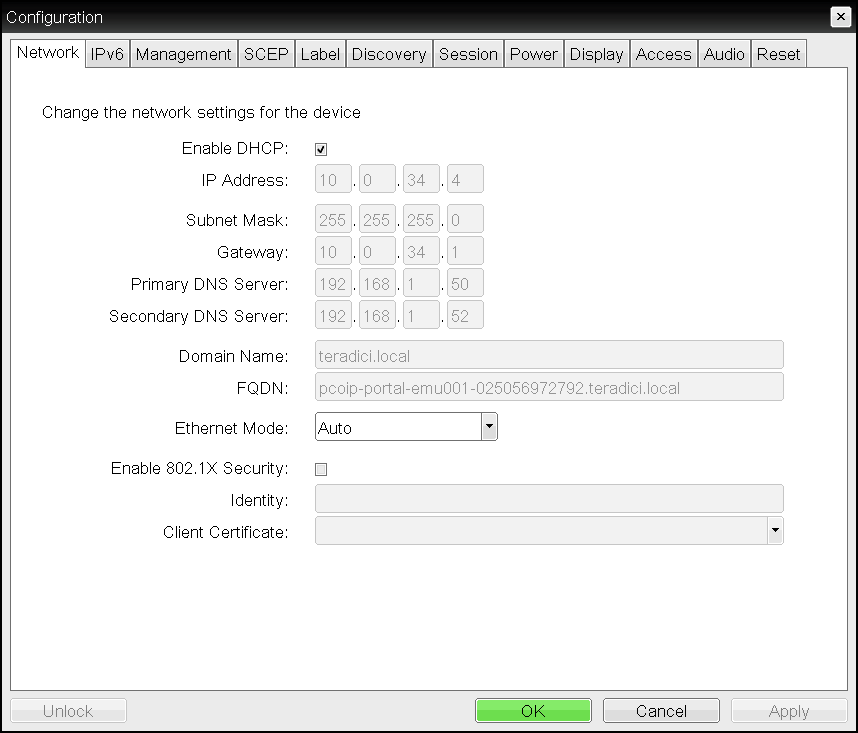

The following parameters display on the OSD and AWI Network pages:
Network Parameters
| Parameter | Description | ||||||
|---|---|---|---|---|---|---|---|
|
Enable DHCP |
When enabled, the device contacts a DHCP server to be assigned an IP address, subnet mask, gateway IP address, and DNS servers, and also requests a domain name (option 15), host name (option 12), and client Fully Qualified Domain Name (FQDN). When disabled, you must set these parameters manually. |
||||||
|
IP Address |
The device’s IP address. If DHCP is disabled, you must set this field to a valid IP address. If DHCP is enabled, you cannot edit this field. |
||||||
|
Subnet Mask |
The device’s subnet mask. If DHCP is disabled, you must set this field to a valid subnet mask. If DHCP is enabled, you cannot edit this field.
|
||||||
|
Gateway |
The device’s gateway IP address. If DHCP is disabled, this field is required. If DHCP is enabled, you cannot edit this field. |
||||||
|
Primary DNS Server |
The device’s primary DNS IP address. This field is optional. If the DNS server IP address is configured when using a connection manager, the connection manager address may be set as an FQDN instead of an IP address. |
||||||
|
Secondary DNS Server |
The device’s secondary DNS IP address. This field is optional. If the DNS server IP address is configured when using a connection manager, the connection manager address may be set as an FQDN instead of an IP address. |
||||||
|
Domain Name |
The domain name of the device (for example, domain.local). This field is optional. |
||||||
|
FQDN |
The fully qualified domain name for the device. The default is pcoip-portal-<MAC> where <MAC> is the device’s MAC address. If used, the domain name is appended (for example, pcoip-portal-<MAC>.domain.local). This field is read-only on this page.
|
||||||
|
Ethernet Mode |
Lets you configure the Ethernet mode of the client as follows:
When you choose 10 Mbps Full Duplex or 100 Mbps Full-Duplex and click Apply, the following warning message appears:
Click OK to change the parameter.
|
||||||
|
Maximum MTU Size (AWI only) |
Lets you configure the Maximum Transfer Unit packet size. A smaller MTU may be needed for situations such as VPN tunneling because PCoIP packets cannot be fragmented. Set the Maximum MTU Size to a value smaller than the network path MTU for the end-to-end connection between the host and client. The Maximum MTU Size range is 600 to 1500 bytes for all firmware versions. The default MTU size is 1200. |
||||||
|
Enable 802.1X Security |
Enable this field for each of your PCoIP Remote Workstation Cards and Tera2 PCoIP Zero Clients if your network uses 802.1x security to ensure that only authorized devices access the network. If enabled, configure the Authentication, Identity, and Client Certificate fields. |
||||||
|
Authentication (AWI only) |
This field is set to TLS (Transport Layer Security) and is grayed-out. TLS is currently the only authentication protocol supported. |
||||||
|
Identity |
Enter the identity string used to identify your device to the network. |
||||||
|
Client Certificate |
Click Choose to select the client certificate you want to use for your 802.1x devices. The list of certificates that appears includes the certificates uploaded from the Certificate Upload page that contain a private key. The certificate you choose from the Network page is linked to the read-only Client Certificate field on the Certificate Upload page.
|
||||||
|
Enable 802.1X Support for Legacy Switches (AWI only) |
When enabled, enables greater 802.1x compatability for older switches on the network. |
To configure network settings: